Chocolate Eclair Cake

Main Ingredients:

1 Box Graham Crackers

2 Large Boxes Vanilla Instant Pudding

2 1/2 Cups Milk

16 oz. Cool Whip

Frosting Ingredients:

1/2 stick of Butter

1 1/2 oz Unsweetened Chocolate

2/3 Cup of Sugar

5 oz Evaporated Milk

Dash Salt

1 tsp Vanilla

  1. Line bottom of a 9×13 inch pan with graham crackers.
  2. Combine pudding, milk, and Cool Whip in a medium bowl.
  3. Spread half of the mixture over the graham crackers.
  4. Cover with another layer of graham crackers and spread with remaining mixture.
  5. Top with final layer of graham crackers.
  6. For frosting, melt butter with chocolate in saucepan
  7. Add sugar, then milk and salt.
  8. Boil for about 5 minutes.
  9. Remove from heat and stir in vanilla.
  10. Cool for a few minutes and then pour over Eclair cake.
  11. Refrigerate for 12 hours before serving.

Store bought frosting may be substituted if desired. If you decide to do so, remove foil from frosting container and microwave for 45-60 seconds until melted and thin, pour over top and refrigerate for 12 hours.

I have used the store bought frosting before and found it to be just as delicious. I love eclair cake. I wish I remembered it more often when thinking about making dessert.

Recipe Source: My Chocolate Therapy

More Recipes

Nature Inspired Candle Holder

Supplies:

Any Size Candle Holder with Flat Sides

Craft Adhesive- For Wood and Glass Surfaces

Garden Pruners

Dry Tree or Shrub Branches

Step 1.

Wash the candle holder with dish soap and dry well. Cut the branches down to sticks close to the height of the candle holder, it is best to cut a few at a time.

Step 2.

Dab the glue on a stick making sure to hit the areas that will be flush to the glass. Place on the glass.  You can do a few at a time and then hold until they won’t slide off before you rotate the holder.

Step 3.

Repeat until all of the glass has been covered. As always, if using a candle holder do not leave these unattended! Isn’t the end result just magnificent?

Originally posted by Fossil

More Decorating Ideas

3 Dozen Tea Light Candles for just $25 or 3 Dozen Votives for just $35

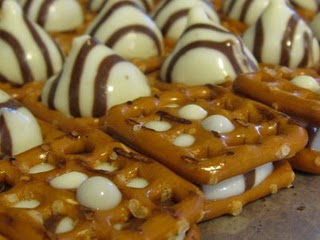
Pretzel Hugs


I absolutely love chocolate covered pretzels. It is one of my favorite holiday traditions. When I came across this recipe from Shelly @ Cookies and Cups, I just couldn’t believe someone had come up with something that looks even better!

These look like the take the idea to a whole new level with more chocolate and less mess!

What a perfect addition to any party as well. The hostess will be happy with a fairly inexpensive snack that didn’t destroy the kitchen and the ladies will be in a delightful chocolate trance.

More Recipes

Chocolate Covered Peanut Butter Cheesecake Pops

Ingredients

Cheesecake:

  • 1 1/2 cups dark brown sugar
  • 1 1/2 pounds cream cheese, at room temperature
  • 1/2 cup heavy cream
  • 2 large egg yolks
  • 1 tablespoon pure vanilla extract
  • 1 3/4 cups creamy peanut butter

Chocolate:

  • 5 tablespoons vegetable shortening
  • 12 ounces semisweet or bittersweet chocolate chips

Directions

Wooden pop sticks

For the cheesecake: Position a rack in the middle of the oven and preheat to 325 degrees F. Line a 8 by 8-inch baking pan with foil letting long flaps overlap on each side. Spray foil with nonstick spray.

Break up the brown sugar to remove all lumps. In a standing mixer with the paddle attachment, beat the cream cheese and sugar on medium speed until very smooth. Add the cream and beat slowly; then add the yolks and vanilla mixing until just combined. Gently stir in peanut butter. Take care not to over beat the mixture; this incorporates too much air and causes the cheesecake to crack.

Pour and evenly spread the batter in the prepared pan. Bake for 15 minutes. Open the oven to release some heat, then lower the temperature to 200 degrees F. Continue to bake the cheesecake until the outside is set but the center is still loose, for about 45 minutes. Turn off the oven, and cool cheesecake in the oven for 45 more minutes. Cover and refrigerate at least 8 hours or overnight.

Lift cheesecake from the pan by lifting up the foil. Transfer to a cutting board. Cut into

1 1/2-inch cubes. Stick a wooden pop stick halfway into each bar and freeze for 1 hour.

Meanwhile, put the shortening and chocolate in a medium heatproof bowl. Bring a saucepan filled with an inch or so of water to a very slow simmer; set the bowl over, but not touching, the water. Stir the chocolate occasionally until melted and smooth. Remove from the heat and let cool slightly. (Alternatively, put the chocolate in a medium microwave-safe bowl. Melt at 50 percent power in the microwave until soft, about 1 minute. Stir, and continue to heat until completely melted, about 1 minute more.)

Dip the pops into the chocolate mixture, and stand on waxed paper to set, about 5 minutes. Serve cold (straight from the fridge), or freeze up to 2 weeks. Frozen pops make a cool summer treat, or can be allowed to temper for 10 minutes at room temperature before serving.

Upgrade: Coat the pops with chopped nuts or candies for a really decadent finish. To do this let the dipped pops drip over a bowl for 15 seconds before rolling them.

This is an original Food Network recipe. How cute are these?

More Recipes

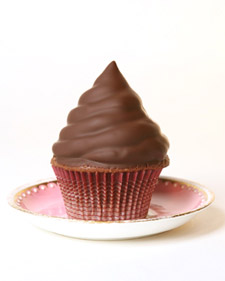
Chocolate Covered Cupcakes…OH MY!

INGREDIENTS:

For The Batter:

3 ounces unsweetened chocolate, chopped

1 cup all-purpose flour

1/2 teaspoon baking powder

1/2 teaspoon baking soda

1/4 teaspoon salt

1/2 cup (1 stick) unsalted butter, softened

1 1/4 cups sugar

2 large eggs

1 teaspoon vanilla extract

1/2 cup sour cream

For The Frosting:

1 3/4 cups sugar

3 large egg whites

1/4 teaspoon cream of tartar

1 teaspoon vanilla extract

1/2 teaspoon almond extract

For The Chocolate Coating:

2 cups chopped (about 12 ounces) semisweet chocolate

3 tablespoons canola or vegetable oil

Directions

Preheat oven to 350 degrees with rack in center. Prepare the batter: Place chocolate in a medium heatproof bowl, and set it over a medium saucepan of barely simmering water; stir chocolate until melted and smooth. Remove bowl from heat, and set aside to cool slightly.

Meanwhile, whisk together flour, baking powder, baking soda, and salt in a medium bowl; set aside.

In the bowl of an electric mixer fitted with the paddle attachment, cream butter and sugar on medium speed, scraping sides of bowl as needed, until light and fluffy. On low speed, mix in melted chocolate. Increase speed to medium, and add eggs, one at a time, mixing well after each addition. Add vanilla, and beat until mixture is creamy and color has lightened slightly, about 1 minute. Mix in sour cream. On low speed, add half of reserved flour mixture, beating until just incorporated. Mix in 1/2 cup water. Add remaining flour mixture, and mix until just incorporated.

Line a cupcake pan with paper liners. Fill each liner with enough batter to come 1/8 inch from top, about 1/3 cup. Bake, rotating pans halfway through, until tops are firm and a cake tester inserted in the center comes out clean, about 20 minutes. Transfer cupcakes to a wire rack to cool in pan for 10 minutes.

Use a small knife to loosen any tops stuck to the pan. Carefully invert cupcakes onto the wire rack. Turn cupcakes right side up, and let cool completely.

Prepare the frosting: In a large heatproof bowl, combine sugar, 1/4 cup water, egg whites, and cream of tartar. Using a handheld electric mixer, beat on high speed until foamy, about 1 minute. Set bowl over a pan of barely simmering water. Beat on high speed until frosting forms stiff peaks, about 12 minutes; frosting should register 160 degrees.on a candy thermometer. Remove from heat; stir in vanilla and almond extracts, and beat for 2 minutes more until frosting thickens.

Transfer frosting to a large pastry bag fitted with a 1/2-inch plain pastry tip. Leaving a 1/8-inch border on each cupcake, pipe a spiral of frosting into a 2-inch-high cone shape, using about 1/2 cup of frosting per cupcake. Transfer cupcakes to a baking sheet, and refrigerate while preparing the chocolate coating.

Prepare the chocolate coating: Combine chocolate and oil in a medium heat-proof bowl set over a medium saucepan of barely simmering water; stir until melted and smooth. Transfer to a small bowl, and let cool about 15 minutes.

Holding each cupcake by its bottom, dip cupcake in the chocolate to coat frosting, allowing excess to drip off. Transfer to a baking sheet fitted with a wire rack. Spoon more coating around edge of cupcake and any exposed frosting; none of the frosting should show. Let cupcakes stand at room temperature 15 minutes.

Carefully remove paper liners from cupcakes, and discard. Place cupcakes on a serving platter, and refrigerate for 30 minutes to let coating set. Cover, and refrigerate for 2 hours more. Serve cold. Cupcakes can be refrigerated for up to 3 days.

  • Holding each cupcake by its bottom, dip cupcake in the chocolate to coat frosting, allowing excess to drip off. Transfer to a baking sheet fitted with a wire rack. Spoon more coating around edge of cupcake and any exposed frosting; none of the frosting should show. Let cupcakes stand at room temperature 15 minutes.
  • Carefully remove paper liners from cupcakes, and discard. Place cupcakes on a serving platter, and refrigerate for 30 minutes to let coating set. Cover, and refrigerate for 2 hours more. Serve cold. Cupcakes can be refrigerated for up to 3 days.

This recipe came from Martha Stewart, she calls them Hi-Hat Cupcakes, and although it sames like these may take a little bit of work, I will totally be putting in the effort. I really think it will be worth it.

More Recipes

Baked Creamy Chicken Taquitos

Yield: 12 taquitos
  • 3 ounces cream cheese, softened
  • 1/4 cup green salsa
  • 1 Tbsp fresh lime juice (juice from half a lime)
  • 1/2 tsp ground cumin
  • 1 tsp chili powder
  • 1/2 tsp onion powder
  • 2 cloves garlic, minced
  • 3 Tbsp chopped cilantro
  • 2 Tbsp sliced green onions
  • 2 cups shredded cooked chicken
  • 1 cup shredded Mexican flavored cheese
  • small flour or corn tortillas
  • kosher salt
  • cooking spray
Preheat your oven to 425˚F. Line a baking sheet with parchment paper.
In a large bowl, mix the cream cheese, salsa, lime juice, ground cumin, chili powder, onion powder and garlic. Once combined, stir in the cilantro and green onions. Add the chicken and cheese; mix thoroughly.
(If you decided to prep this in advance, refrigerate the mixture at this point until ready to continue.)
Working with a few tortillas at a time, heat them in the microwave between two paper towels until they are soft enough to roll (about 20 – 30 seconds).
Spoon 2-3 Tablespoons of the chicken mixture onto the lower third of a tortilla. Roll the tortilla as tightly as you can.
Place the rolled tortilla seam side down on the baking sheet. Repeat with remaining tortillas until the mixture is gone.  Make sure the taquitos are not touching each other. Spray the tops lightly with cooking spray and sprinkle with kosher salt.
Bake for 15 – 20 minutes or until crisp and golden.
Serve with salsa, sour cream or guacamole.
Recipe Source: Chef In Training 

Mason Jar Centerpiece

What a beautiful use of a tea light candle!  The possibilities here are endless, from the color of the glass beads, the tea light, the material used to tie the bow, and even the color of the jar, this can easily be made to fit any occasion!

For the party consultant, what a wonderful way to show an awesome use for a tea light candle.

Mix or Match 3 Dozen Tealights $25 or 3 Dozen Votives for $35

Photo Credit: I Share Crafts

More Displays

Banana Caramel Cream Dessert

Ingredients~
Vanilla Pastry Cream (recipe below)
Bananas (I used two bananas for 6 small dessert servings)
Good quality caramel sauce, or dulce de leche.
Fresh whipped cream (I used 3/4 cup heavy whipping cream and 1 Tablespoon powdered sugar)
Graham Cracker crumble (recipe below)
Vanilla Pastry Cream
2/3 cup sugar (can be reduced to 1/2 cup if you prefer desserts less sweet)
1/4 cup cornstarch
1/2 teaspoon salt
3 cups whole milk
2 eggs
2 Tablespoons butter
1 Tablespoon vanilla extract (or 2 teaspoons vanilla extract and 1 teaspoon vanilla bean paste)
Directions:
In a medium bowl,  beat eggs with a fork to combine.  Set aside.
Mix sugar, cornstarch and salt in a medium saucepan.  Gradually pour in milk, while whisking, to make a smooth mixture.  Cook over medium heat, stirring almost constantly, until the mixture thickens and boils.  Continue to cook and stir one minute.
Pour several tablespoons of the hot mixture into the bowl with the eggs and immediately stir well.  Pour warmed egg mixture into the pan with the rest of the hot milk mixture.  Return to a slow boil, and cook one minute, stirring constantly.
Remove from heat and stir in butter and vanilla.  Set aside to cool.  When the pan has cooled, place in the refrigerator to fully cool.  If desired, lay a piece of plastic wrap on the top surface of the pastry cream to prevent a skin from forming.
Graham Cracker Crumble
1 1/2 cups graham cracker crumbs (about 10 full sized crackers)
1/3 cup butter, melted
1 Tablespoon sugar
Directions:
Crush crackers in a large ziplock type bag.  Pour crumbs, sugar and melted butter into a bowl and , stir until fully combined.  Pour into a 9″x13″ casserole dish and press into a even layer.  Bake at 350*F for 10-12 minutes, until light brown.  Allow to cool.
Dessert assembly~
(pictured below as well)
1.  Spoon about 2 tablespoons graham cracker crumble into individual serving dishes.  Use a small glass to press the crumble into a firm layer (as pictured below).
2.  Add a layer of pastry cream into each dish.  For easy assembly, fill a large ziplock type bag with the pastry cream, snip off the end and fill the dishes from this bag.
3.  Add a few slices of banana.
4.  Top bananas with a layer of whipped cream.
5.  Add some graham cracker crumble and a drizzle of caramel (scoop caramel or dulce de leche into a small ziplock bag and snip off the end for easy application).
Repeat layers 2-5
Serve immediately or refrigerate up to 3 hours.  Top with a slice of fresh banana just before serving.
Note:  I used 6 small dessert dishes.   If you make 6 desserts, you will have pastry cream and graham cracker crumble left over.  If you want to make more desserts, or one large trifle dish, you will have enough pastry cream and graham cracker crumble for 10-12 individual desserts.  For a large trifle, or more than 6 individual desserts I would double the amount of whipped cream listed above.
I absolutely love bananas and I cannot wait to try this recipe from Glorius Treats. Glorius Indeed!

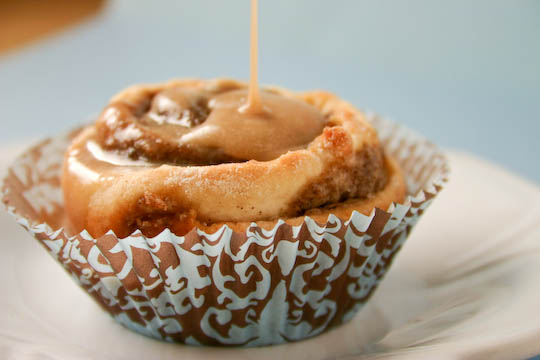
Cinnamon Pinwheels with Maple-Coffee Icing

Pinwheels
2 cups Bisquick
2/3 cup milk
4 tablespoons melted butter
1 cup packed brown sugar
2 teaspoons ground cinnamon

Maple-Coffee Icing
1/2 cup + 2 tablespoons powdered sugar
2 tablespoons milk
2 tablespoons melted butter
A pinch of salt
1/2 teaspoon maple extract
1 tablespoon strongly brewed coffee

Preheat oven to 400°F. Grease a muffin sheet with non-stick cooking spray or line with paper liners and set aside.In a small bowl, mix together the brown sugar and cinnamon and set aside.Mix Bisquick and milk together with a wooden spoon until dough comes together, then turn dough onto a floured surface and knead for about 3-4 minutes.

Roll dough into a large rectangle, 1/4-inch thick, and brush with melted butter. Sprinkle about 3/4 cup of the brown sugar mixture over the dough; sprinkle the remaining brown sugar mixture in the bottom of each muffin cup well.

Roll dough, jelly roll fashion, tucking in the ends so that the brown sugar stays inside; slice into 12 biscuits. Place cut-side down in muffin cups on top of the brown sugar. Bake for 10-12 minutes, or until a toothpick inserted into the middle comes out clean. Turn out of the pan onto waxed paper immediately.

For the icing, mix together all the ingredients with a whisk until icing comes together. It should be thick, but too thick to pour. Depending on the consistency you want, you may want to add a tablespoon more or less of powdered sugar. Drizzle over the cinnamon rolls and serve warm.

Makes 12 pinwheels.
I would like to thank Baker Girl from the bottom of my heart for posting this scrumptious looking recipe.  This is definitely near the top of my try it list!

PartyLite Grand Opening

I’m thrilled to announce that I am starting a new business as an Independent PartyLite Consultant.I’m so excited and invite you to help launch my business. My first step is to earn my business kit.You can help by simply placing an order and spreading the word! After all, who doesn’t love candles, home accents and yummy gourmet food?Thanks for helping me launch my PartyLite business!

I am still working on trying to earn my PartyLite starter kit. The GREAT news is, the brand new SUMMER catalog has arrived! Plus, there are some AWESOME specials for guests during the month of April.

1st- Take ½ OFF any Summer or Winter/Spring Item with every $50 purchase!

2nd-  Mix or Match Fragrances/3Dozen Tealights for $25 or 3 Dozen Votives for $35

3rd- Guest Specials/Save up to 85%! Prices as low as $3

4th-  Summer Sale 50 to 75% off

5th-Very Important. To make sure I  get credit for your order, please follow these steps after clicking a link:

  • Click on Look up Host
  • Enter my name: Monica Merrill
  • Click on link, Monica M, Click continue and have fun shopping!

Feel free to contact me if you have any questions or need help locating the specials and Have a most wonderful Day!

Thank you,
Monica Merrill

Your NEW PartyLite Consultant

cupcakesandcandles12@gmail.com
(772) 475-5759